facebook google twitter tumblr instagram linkedin
  • HOME
  • RECIPES
  • STORY
  • QUIZ
  • ABOUT US
  • CONTACT
  • PRIVACY POLICY

Afterka


These homemade Chocolate Twinkies are filled with a fluffy marshmallow cream, making them a delightful treat that surpasses the original.


#### Ingredients:


**Twinkie Cake:**

- 1 box chocolate cake mix (plus ingredients listed on the box)


**Filling:**

- 5 tablespoons flour

- 1 cup milk

- 1/4 teaspoon salt

- 1 teaspoon vanilla extract

- 1 cup granulated sugar

- 1/2 cup shortening

- 1/2 cup margarine

- 1/2 teaspoon salt


#### Preparation:


1. **Bake the Cake:**

   - Prepare and bake the chocolate cake according to the package directions for a 9x13-inch pan. Allow the cake to cool completely.


2. **Prepare the Filling:**

   - In a medium saucepan, whisk together the flour, milk, and 1/4 teaspoon salt over medium heat. Cook until thickened to a thin gravy-like consistency. Remove from heat, stir in the vanilla extract, and let it cool completely (refrigerate to speed up cooling).


3. **Cream Filling Ingredients:**

   - In a medium bowl, cream together the granulated sugar, shortening, margarine, and 1/2 teaspoon salt until light and fluffy.


4. **Combine Filling:**

   - Once the flour mixture has cooled, add it to the creamed sugar mixture. Beat on high speed for about 10 minutes until the mixture is fluffy and resembles the consistency of Twinkie filling.


5. **Assemble the Cake:**

   - Turn the cooled cake out of the pan onto a large plate or cutting board. If the cake is very moist, freeze it for a few minutes to help it release from the pan easily.

   - Using a large knife or cake leveler, slice the cake horizontally in half.

   - Place the bottom half of the cake back into the original pan.


6. **Fill the Cake:**

   - Spread the cream filling evenly over the bottom layer of the cake, leaving a 1/4-inch border around the edges to prevent the filling from spilling out.

   - Carefully place the top half of the cake back onto the filling.


7. **Optional Frosting:**

   - If desired, frost the cake with your favorite chocolate frosting. For multiple layers, freeze the cake after adding the filling to help the layers set and prevent the filling from mixing with the frosting.


8. **Serve:**

   - No need to refrigerate; the cake keeps well at room temperature for its normal lifespan.


Enjoy your delicious homemade Chocolate Twinkies!


This tropical twist on classic banana bread is bursting with flavors of coconut, pineapple, and banana. It's moist, flavorful, and perfect for a sweet treat any time of day.


#### Ingredients:

- **1/2 cup butter**, softened

- **1 cup sugar**

- **2 large eggs**

- **1 very ripe banana**, mashed

- **1 cup crushed pineapple** (do not drain)

- **2 cups all-purpose flour**

- **1 tsp baking powder**

- **1/2 tsp baking soda**

- **1/4 tsp salt**

- **1/4 cup shredded coconut**


#### Preparation:


1. **Preheat Oven:**

   - Preheat your oven to 350°F (175°C).


2. **Cream Butter and Sugar:**

   - In a large bowl, use a mixer to cream together the softened butter and sugar until the mixture is light and fluffy.


3. **Add Eggs:**

   - Beat in the eggs one at a time, ensuring each egg is fully incorporated before adding the next.


4. **Incorporate Banana and Pineapple:**

   - Stir in the mashed banana and the crushed pineapple with its juice until well combined.


5. **Combine Dry Ingredients:**

   - In a separate medium-sized bowl, sift together the flour, baking powder, baking soda, and salt.


6. **Mix Wet and Dry Ingredients:**

   - Gradually add the dry ingredients to the wet mixture, stirring just until combined. Do not overmix.


7. **Add Coconut:**

   - Fold in the shredded coconut flakes gently until evenly distributed throughout the batter.


8. **Prepare Loaf Pan:**

   - Grease a 9×5 inch loaf pan. Pour the batter into the prepared pan and spread it out evenly.


9. **Bake:**

   - Bake in the preheated oven for about 60 minutes, or until a toothpick inserted into the center of the loaf comes out clean.


10. **Cool and Serve:**

    - Allow the bread to cool in the pan for about 10 minutes, then transfer it to a wire rack to cool completely.


Enjoy your delicious homemade Hawaiian Banana Bread with Coconut and Pineapple! It's perfect for breakfast, a snack, or dessert.


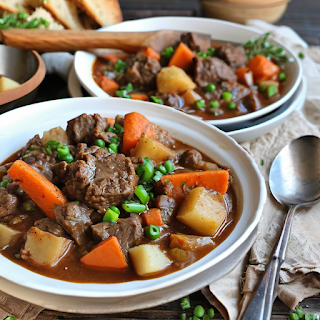
This hearty beef stew is perfect for warming up on chilly days. The beef becomes incredibly tender after slow cooking in a rich, flavorful sauce.


#### Ingredients:

- **2 pounds beef stew meat**

- **½ cup all-purpose flour**

- **1 tablespoon seasoning salt**

- **2 tablespoons olive oil**

- **½ teaspoon black pepper**

- **1 large onion**, diced

- **2 bay leaves**

- **¼ cup Worcestershire sauce**

- **2 cups water**

- **2 heaping teaspoons beef demi-glace** (or beef Swanson Flavor Boost)

- **4 medium to large red-skinned potatoes**, washed & diced

- **3 large carrots**, peeled & sliced

- **1 stalk celery**, diced


#### Directions:


1. **Coat the Beef:**

   - Place the beef stew meat in a resealable plastic bag along with the flour and seasoning salt. Shake until the meat is evenly coated.


2. **Brown the Meat:**

   - Heat the olive oil in a skillet over medium-high heat.

   - Add the floured stew meat to the skillet and brown on all sides. Use a slotted spoon or tongs to transfer the browned meat to the bottom of a slow cooker. Season with black pepper.


3. **Sauté the Onions:**

   - In the same skillet, sauté the diced onion for about 2 minutes. Do not clean the skillet beforehand; the browned bits add flavor.

   - Transfer the sautéed onions to the slow cooker.


4. **Prepare the Broth:**

   - Pour the Worcestershire sauce, water, and beef demi-glace (or Swanson Flavor Boost) into the skillet. Whisk to combine, making sure to scrape up any browned bits from the bottom of the pan. Turn off the heat and set aside.


5. **Add Vegetables:**

   - Add the diced potatoes, sliced carrots, diced celery, and bay leaves to the slow cooker.


6. **Combine Everything:**

   - Pour the broth mixture from the skillet into the slow cooker, covering the meat and vegetables.


7. **Cook the Stew:**

   - Cover the slow cooker and cook on low for 8 hours, or until the meat and vegetables are tender.


8. **Serve:**

   - Before serving, remove the bay leaves.

   - Serve the stew hot, ideally with a crusty bread or over mashed potatoes.


Enjoy this rich and comforting beef stew that is perfect for a cold day!


These Strawberry Crunch Cheesecake Tacos combine crunchy graham cracker-coated tortilla shells with a creamy cheesecake filling, topped with a sweet strawberry mixture and fresh strawberries. It's a delightful dessert that is sure to impress!


#### Ingredients:

- **5 8-inch tortillas** (about 20 rounds)

- **1 cup graham cracker crumbs**

- **1/4 cup butter**, melted

- **1 cup strawberries**, chopped

- **1/4 cup sugar**

- **2 tsp water**

- **1 tbsp cornstarch**

- **1 tbsp cold water**

- **1 cup heavy cream**

- **1 cup cream cheese**, softened

- **1 tsp lemon zest**

- **1 tsp vanilla**

- **1/4 cup powdered sugar**


#### Directions:


1. **Preheat Oven:**

   - Preheat your oven to 400°F (200°C).


2. **Prepare Tortilla Shells:**

   - Use a cookie cutter to cut 4-5 rounds out of each tortilla shell, yielding about 20 rounds.

   - Dip each tortilla round into the melted butter, then coat it with graham cracker crumbs.

   - Flip a muffin tin upside down and place the tortilla rounds between the muffin cups.

   - Bake for 10 minutes until they are just golden brown. Let them cool in the pan.


3. **Make the Strawberry Filling:**

   - In a small pot, combine the strawberries, sugar, and 2 teaspoons of water. Bring to a boil, then reduce to a simmer to soften the strawberries.

   - Dissolve the cornstarch in 1 tablespoon of cold water and pour it into the strawberry mixture. Bring to a boil, stirring constantly until the mixture thickens slightly and is slightly chunky. Remove from heat and let cool completely.


4. **Prepare the Cheesecake Filling:**

   - In a mixing bowl, beat the cream cheese, heavy cream, powdered sugar, lemon zest, and vanilla on medium speed for 2 minutes, or until the mixture thickens.

   - Chill the cheesecake filling in the fridge for 30 minutes, then transfer it to a piping bag.


5. **Assemble the Tacos:**

   - Fill each tortilla shell with the cheesecake filling using the piping bag.

   - Top each taco with about 1/2 teaspoon of the strawberry filling.

   - Optionally, sprinkle additional graham cracker crumbs on top.


6. **Serve and Enjoy:**

   - Serve the Strawberry Crunch Cheesecake Tacos immediately for the best texture and flavor.


These delightful cheesecake tacos are perfect for a fun dessert or a special occasion treat. Enjoy!


These old-fashioned peach pies are a delightful treat that's super easy to make. The sweet peach filling combined with the crispy crust and vanilla glaze makes for a perfect dessert.


#### Ingredients:

- **2 boxes (14.1 oz each) refrigerated pie crust**

- **1 can (21 oz) peach pie filling**

- **1 tsp cinnamon**

- **2 ½ cups powdered sugar**

- **¼ cup milk**

- **1 egg white**, beaten


#### Instructions:


1. **Preheat Oven:**

   - Preheat your oven to 425°F (220°C). Remove the pie crusts from the package and allow them to come to room temperature.


2. **Prepare Filling:**

   - Empty the peach pie filling into a shallow bowl. Dice the peaches into small pieces using a fork and knife. Mix in the cinnamon until well blended. Set aside.


3. **Cut Pie Crusts:**

   - Unroll the pie crusts and cut out 6 circles from each crust using a 4-inch biscuit cutter. You may need to re-roll the scraps to get the 6th circle from each crust.


4. **Fill and Seal Pies:**

   - Using a 1 tablespoon cookie scoop, place the peach pie filling into the center of each pie crust circle. Fold the circles in half and pinch the edges to seal. Fold the pinched edges over and press with the tines of a fork to secure. Poke each pie once with a fork to prevent bursting.


5. **Egg Wash:**

   - Beat the egg white in a small bowl until frothy. Brush the egg white over the tops of each hand pie.


6. **Bake:**

   - Place the pies on a parchment paper-lined baking sheet, spacing them about 1 inch apart. Bake for about 15 minutes, or until they are golden brown.


7. **Prepare Glaze:**

   - While the pies are baking, whisk together the powdered sugar and milk until smooth.


8. **Glaze the Pies:**

   - Remove the baked pies from the baking sheet and, while they are still warm, dip them into the glaze to coat completely. Use two forks to flip them in the glaze and remove them carefully. Place the glazed pies back on the parchment paper and allow them to set for about 5 minutes.


9. **Serve:**

   - Enjoy your delicious Southern Fried Peach Pies with a vanilla glaze warm or at room temperature!


These pies are perfect for any occasion and sure to be a hit with everyone. Enjoy!


These delightful snowball cookies are a Christmas tradition. Their buttery, melt-in-your-mouth texture combined with the sweetness of powdered sugar makes them irresistible.


#### Ingredients:

- **1 cup butter**, softened

- **1/2 cup powdered sugar**

- **1/4 teaspoon salt**

- **1 1/2 teaspoons vanilla extract**

- **2 1/4 cups flour**

- **1 cup finely chopped pecans**

- **1 cup powdered sugar** (for dusting)


#### Directions:


1. **Preheat Oven:**

   - Preheat your oven to 350°F (175°C).


2. **Cream Butter and Sugar:**

   - In a large bowl, cream together the softened butter and 1/2 cup powdered sugar until the mixture is light and fluffy.


3. **Add Salt and Vanilla:**

   - Mix in the salt and vanilla extract until well combined.


4. **Add Flour:**

   - Gradually add the flour to the butter mixture, mixing until a soft dough forms.


5. **Fold in Pecans:**

   - Gently fold in the finely chopped pecans until evenly distributed throughout the dough.


6. **Shape the Cookies:**

   - Roll the dough into 1-inch balls and place them on a parchment-lined baking sheet.


7. **Bake:**

   - Bake the cookies in the preheated oven for 10-12 minutes, or until they are lightly golden on the bottoms.


8. **Cool:**

   - Let the cookies cool on the baking sheet for 5 minutes, then transfer them to a wire rack to cool completely.


9. **Coat with Powdered Sugar:**

   - Once the cookies are completely cool, roll them in the remaining powdered sugar to coat them generously.


10. **Serve and Enjoy:**

    - Enjoy these melt-in-your-mouth snowball cookies with a cup of hot cocoa or your favorite holiday beverage!


These cookies are not only a treat for the taste buds but also a joy to make and share during the holiday season. Enjoy!


This hearty and flavorful dish combines smoked sausage, potatoes, onion, and bell peppers for an easy and satisfying meal. Perfect for busy weeknights, it requires minimal cleanup since everything cooks in one pan.


#### Ingredients:

- **1½ pounds russet potatoes**, diced into 1/2" cubes

- **1 pound smoked sausage**, sliced

- **2 tablespoons olive oil**

- **½ teaspoon seasoned salt**

- **½ teaspoon Italian seasoning**

- **½ large red bell pepper**, sliced

- **½ large green bell pepper**, sliced

- **1 small onion**, diced

- **Black pepper**, to taste

- **Shredded parmesan cheese**, for garnish


#### Instructions:


1. **Sauté Onions:**

   - In a large pan, sauté the diced onion in 1 tablespoon of butter over medium heat until the onion becomes translucent and soft. Remove the onion from the pan and set aside.


2. **Cook Potatoes:**

   - In the same large skillet, heat 1 tablespoon butter and 1 tablespoon olive oil until the butter is melted. Add the diced potatoes, seasoned salt, Italian seasoning, and black pepper. Stir to combine.


3. **Cover and Cook:**

   - Cover the skillet and cook the potatoes, stirring occasionally, for about 15 minutes or until the potatoes are starting to soften.


4. **Add Sausage:**

   - Add the sliced smoked sausage to the skillet with the potatoes. Continue to cook, uncovered, for another 10 minutes, stirring occasionally, until the sausage is browned and the potatoes are tender.


5. **Combine Ingredients:**

   - Add the sautéed onions and sliced bell peppers to the skillet. Sauté everything together until the peppers are tender-crisp, about 5 minutes.


6. **Garnish and Serve:**

   - If desired, sprinkle shredded parmesan cheese over the top of the dish before serving.


7. **Enjoy:**

   - Serve the smoked sausage and potato mixture hot and enjoy this comforting and delicious meal.


This one-pan smoked sausage and potatoes dish is a perfect blend of flavors and textures, making it a favorite for family dinners. The addition of bell peppers and onions enhances the taste, while the parmesan cheese adds a nice finishing touch. Enjoy your meal!


Indulge in the rich flavors of this decadent rum cake, perfect for special occasions or a delightful dessert any time. The combination of a moist yellow cake infused with rum and topped with a buttery glaze makes this recipe a crowd-pleaser. Follow these simple steps to create your own irresistible rum cake with glaze.

#### Ingredients:

**Cake:**
- 1 yellow cake mix
- 1 small package vanilla pudding (instant)
- 1/2 cup rum
- 1/2 cup vegetable oil
- 1/2 cup water
- 4 eggs
- 1/2 cup chopped pecans or walnuts

**Glaze:**
- 1 stick (1/2 cup) butter
- 1/4 cup rum
- 1/4 cup water
- 1 cup sugar

#### Directions:

1. **Prepare Cake Batter:**
   - In a large bowl, beat together the cake mix, instant vanilla pudding mix, rum, vegetable oil, water, and eggs until well combined and smooth.

2. **Prepare Baking Pan:**
   - Grease and flour a bundt pan. Sprinkle the chopped pecans or walnuts evenly over the bottom of the pan.

3. **Bake:**
   - Pour the prepared cake batter into the bundt pan over the chopped nuts. Bake in a preheated oven at 350°F (175°C) for 60-70 minutes, or until a toothpick inserted into the center comes out clean.

4. **Cool in Pan:**
   - Allow the cake to cool in the pan for about 10-15 minutes while you prepare the glaze.

5. **Prepare Glaze:**
   - In a medium saucepan, combine the butter, rum, water, and sugar. Bring the mixture to a boil over medium heat, stirring constantly. Let it boil for about 2 minutes.

6. **Pour Glaze:**
   - Slowly pour the hot glaze over the warm cake in the bundt pan. Allow the glaze to soak into the cake for a few minutes.

7. **Serve:**
   - Carefully invert the cake onto a serving platter to release it from the pan. Serve the rum cake slices warm or at room temperature.

8. **Enjoy:**
   - Slice and enjoy this delicious rum cake with its rich flavors and moist texture. It's sure to be a hit with friends and family!

This rum cake with glaze is a delightful treat that's perfect for any occasion. Whether you're celebrating a special event or simply craving a sweet indulgence, this recipe is sure to satisfy your dessert cravings. Enjoy every bite of this irresistible cake! 


Calzones are a delicious twist on traditional pizza, perfect for a family dinner or a quick meal on the go. These homemade calzones are easy to make and can be customized with your favorite fillings. Plus, they freeze well for convenient meals later on. Follow these simple steps to make your own tasty calzones at home.


#### Ingredients:


- 1 basic pizza dough (recipe posted earlier)

- Fillings of your choice (no more than 5 to avoid overfilling)

- Pizza blend shredded cheese

- Pinch of garlic powder

- Pinch of dried basil

- 1 tablespoon butter


#### Directions:


1. **Prepare the Dough:** Roll out the pizza dough into a 12-inch circle on a lightly floured surface.


2. **Add Fillings:** Place a layer of shredded cheese on one half of the dough circle, leaving a border around the edge. Add your desired fillings on top of the cheese. Be sure not to overfill the calzone.


3. **Fold and Seal:** Carefully fold the top half of the dough over the fillings to cover them completely. Use your fingers to press and seal the edges of the dough together, ensuring that no filling leaks out during baking.


4. **Prepare Butter Topping:** In a small saucepan, melt the butter over low heat. Stir in the garlic powder and dried basil until well combined.


5. **Brush the Calzone:** Using a pastry brush, generously brush the melted butter mixture over the top of the calzone.


6. **Ventilation:** Use a sharp knife to make a few small slits in the top of the calzone to allow steam to escape during baking.


7. **Bake:** Preheat your oven to 425°F (220°C). Place the calzone on a baking sheet lined with parchment paper or lightly greased. Bake for 15-20 minutes, or until the crust is golden brown and crisp.


8. **Serve:** Remove the calzone from the oven and let it cool for a few minutes before slicing. Serve with a side of warm pizza sauce for dipping.


9. **Enjoy:** Dig into your homemade calzone and enjoy the delicious combination of flavors!


These homemade calzones are sure to become a family favorite. Experiment with different fillings and toppings to create your own unique creations. And don't forget to freeze any leftovers for a quick and convenient meal later on. Buon appetito!


These Spinach and Feta Crescent Rolls are the perfect appetizer or snack for any occasion. With a savory filling of spinach, feta cheese, and olives wrapped in flaky crescent roll dough, they're sure to be a hit with everyone! Follow these simple steps to make your own delicious crescent rolls.


#### Ingredients:


- 2 cans refrigerated crescent rolls (8 oz each)

- 4 oz feta cheese crumbles

- 4 oz mozzarella cheese, shredded

- 3 oz spinach, fresh or frozen

- 2 oz black olives, diced

- 1 egg white, beaten

- 1/4 tsp red pepper flakes

- Salt, to taste


#### Instructions:


1. Preheat your oven according to the temperature indicated on the packaging of the crescent rolls.


2. Begin by chopping the spinach and olives and placing them in a large mixing bowl. Add the feta cheese, mozzarella cheese, red pepper flakes, and a pinch of salt. Toss the mixture thoroughly to combine, and then set the bowl aside.


3. Unroll the crescent dough and separate it into triangles. 


4. Spoon small amounts of the spinach and cheese mixture onto the wide part of each dough triangle.


5. Starting from the wide end, roll up each triangle of dough to enclose the filling, forming crescent shapes.


6. Place the filled crescent rolls on a greased or parchment-lined baking sheet.


7. Lightly brush the top of each roll with the beaten egg white.


8. Bake the crescent rolls in the preheated oven for about 15 minutes, or until they are golden brown and cooked through.


9. Remove the rolls from the oven and let them cool slightly before serving.


10. Enjoy your delicious Spinach and Feta Crescent Rolls as a tasty appetizer or snack!


These savory crescent rolls are sure to be a hit at your next gathering. Serve them warm and watch them disappear!

Older Posts

HELLO, THERE!


Hello, There!
Hello, There!

Vix no volumus ocurreret maiestatis, quaeque alienum eum te, semper principes deseru


Find More


LET’S BE FRIENDS

Popular Posts

FOLLOW ME @FACEBOOK

Created with by BeautyTemplates | Distributed by blogger templates